Sailboat Rigging
Part 1: Standing Rigging
When we talk about sailboat rigging, we mean all the wires, ropes and lines that support the rig and control the sails. To be more precise, the highly tensioned stays and shrouds that support the mast are known collectively as standing rigging, whilst the rope halyards, sheets and other control lines come under the heading of running rigging.
 Probably not the best image to illustrate an article about standing rigging, as this sailboat - a Freedom 44 cat ketch - with its unsupported masts, doesn't have any...
Some sailboats with unsupported masts, like the junk rig and catboat rigs have no standing rigging at all.
Bermudan sloops with their single mast and just one headsail will have a relatively simple rigging layout - those with a single set of spreaders especially so.
The most complex rigging of all will be found on staysail ketches and schooners with multi-spreader rigs.
 This staysail ketch - a Bowman 57 - needs a network of standing rigging to support its two masts...
Fairly obviously, the mast on a sailboat is an important bit of kit.
Let's make a start by taking a look at the standing rigging that holds it up...
Standing Rigging
Modern sailboats use a variety of materials for standing rigging to enhance performance, durability, and safety. Here are some of the most common materials:
- Stainless Steel Wire: This is the most widely used material for standing rigging on cruising sailboats due to its excellent strength and resistance to corrosion. It's easy to inspect for wear and stress, as individual strands often break near swage fittings.
- Nitronic-50 Stainless Steel Rod: This material is used for its superior strength and durability. It's more aerodynamic than wire but requires professional inspection for stress fractures.
- Synthetic Rigging (e.g., Dyneema®): These newer materials are lightweight and offer high strength with reduced wind resistance. They are becoming increasingly popular for their performance benefits.
- Carbon Fiber: Though more expensive, carbon fiber is used in high-performance racing yachts for its lightweight and strong properties, which can significantly enhance speed and performance.
- Composite Fibre Lines: These are used to reduce weight and windage aloft, improving overall performance.
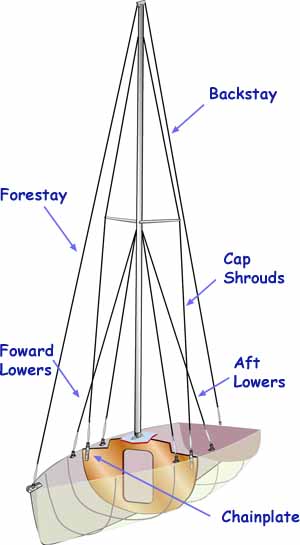 A single-spreader sloop rig
There are two variations of the Bermudan sloop rig shown here—the masthead rig and the fractional rig. And here's the lowdown on both of them...
Cap Shrouds
These are the parts of a sailboat's rigging that hold the mast in place athwartship. They're attached at the masthead and via chainplates to the hull.
Lower Shrouds
Further athwartship support is provided by forward and aft lower shrouds, which are connected to the mast just under the first spreader and at the other end to the hull.
Stays
The mast is supported fore and aft by stays - the forestay and backstay to be precise.
Cutter rigs require an inner forestay upon which to hang the staysail, which unlike a removable inner forestay, becomes an element of the overall rig structure.
As this stay exerts a forward component of force on the mast, it must be resisted by an equal and opposite force acting aft - either by swept-back spreaders, aft intermediates or running backstays.
Another stay that deserves a mention is the triatic backstay. This is the stay that is found on some ketches, and it's the stay from the top of the mainmast to the top of the mizzen mast.
It's a convenient alternative to a independent forestay for the mizzen. Although it makes a great antenna for an SSB radio, it does ensure that if you lose one mast, you're likely to lose the other.
Multi-Spreader Rigs
With the lower shrouds supporting the mast athwartship at the lower spreaders, intermediate shrouds do the same thing for any other sets of spreaders. These take the form of a diagonal tie between the inner end of one spreader and the outer end of the spreader below it.
Continuous or Discontinuous Sailboat Rigging
The shrouds on all single-spreader rig and some double-spreader rigs are continuous. With three or more spreaders, this arrangement becomes impractical - discontinuous rigging is the way to go. So what's that?
Well, if you consider the mast rigging as a series of panels, ie:
- Lower Panel - From the deck to the first set of spreaders;
- Top panel - From top set of spreaders to the masthead;
- Intermediate Panels - Between each set of spreaders.
Then discontinuous rigging is when each shroud is terminated at the top and bottom of each panel.
The main benefits of discontinuous sailboat rigging is:
- The rig can be more accurately set up, and
- Weight aloft is substantially reduced;
- It can be replaced in small doses.
Chainplates, Turnbuckles and Toggles
It's through these vitally important sailboat rigging components the shrouds are attached to the hull.
The chainplate is a metal plate bolted to a strongpoint in the hull, often a reinforced section of a bulkhead.
It must be aligned with angle of the shroud attached to it through a toggle, to avoid all but direct tensile loads.
Whilst cap shrouds will be vertical - or close to it - lower shrouds will be angled in both a fore-and-aft direction and athwartship.
Artwork by Andrew Simpson
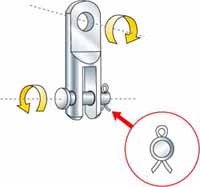
Toggles are stainless steel fittings whose sole purpose in life is absorb any non-linear loads between the shrouds and the chainplate.
Consequently, they must be of a design that enables rotation in both the vertical and horizontal planes.
Note the split pin! These are much more secure than split rings which can gradually work their out of clevis pins - with disastrous results.
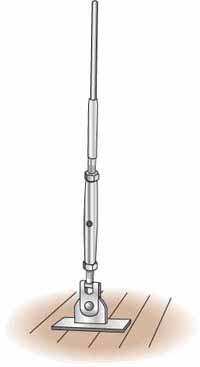
Turnbuckles, or rigging screws or bottlescrews, are stainless steel devices that enables the shroud tension to be adjusted.
Cruisers' Questions...
How often should I replace standing rigging on my sailboat?
How often should I replace standing rigging on my sailboat?
The frequency for replacing standing rigging on a sailboat can vary based on several factors, including the material of the rigging, how often you sail, and the conditions you sail in. Here are some general guidelines:
- Wire Rigging: Typically, wire rigging should be replaced every 8-10 years. The Royal Yachting Association (RYA) suggests this interval.
- Synthetic Rigging: If your rigging is made of synthetic fibers like Dyneema, it generally needs to be replaced every 5-10 years.
- Carbon Fibre Rigging: Carbon fiber rigging can last longer but is more expensive. It's often recommended to replace it every 10-15 years.
It's also important to perform annual visual inspections and have a professional inspection every 5 years.
What wire is best for standing rigging?
What wire is best for standing rigging?
The best wire for standing rigging typically depends on the specific needs of your yacht and the conditions it will face. Here are some commonly used options:
- 1x19 Stainless Steel Wire: This is the most commonly used wire for standing rigging due to its stiffness and strength. It's ideal for cruising yachts.
- 7x19 Stainless Steel Wire: This wire offers greater flexibility compared to 1x19 and is often used for racing yachts or extended cruising.
- Dyform Wire: This wire has a lower stretch than 1x19 and is suitable for performance-oriented applications.
How do I know if my standing rigging needs replacing?
How do I know if my standing rigging needs replacing?
Identifying whether your standing rigging needs replacement is crucial for sailing safety. Here's a breakdown of how to assess its condition:
Visual Inspection:
- Corrosion: Look for rust, pitting, or white powdery deposits on stainless steel rigging. Pay close attention to areas where rigging enters or exits fittings. This is a common sign of crevice corrosion.
- Broken Wires: Inspect the strands of wire rope for any broken individual wires, especially near swages, terminals, and where the rigging passes over spreaders. Even one broken strand can indicate weakness.
- Fraying: Check for fraying or wear on the outer layers of the wire rope. This is a sign of general wear and tear.
- Swage and Terminal Condition: Examine swages (the fittings at the ends of the rigging) for cracks, distortion, or slippage. Check terminals (turnbuckles, toggles, etc.) for cracks, deformation, and proper functioning.
- Cracks in fittings: Inspect all metal fittings, including spreaders, tangs, and chainplates, for any signs of cracking or damage.
- Deformation: Check for any unusual bends or kinks in the rigging.
- Loose Strands: Look for strands that have become loose or separated from the rest of the wire.
Functional Checks:
- Turnbuckles: Ensure turnbuckles are not seized and can be adjusted easily. Check for any signs of thread damage.
- Movement: Check for excessive movement or play in the rigging, especially at the connections.
- Sailing Performance: Note any changes in the boat's sailing performance, such as difficulty in maintaining sail shape or unusual creaking noises. These can sometimes indicate rigging issues.
Other Factors:
- Age: Even if the rigging looks good, consider its age. Most experts recommend replacing standing rigging every 10-15 years, regardless of its apparent condition. This is because internal corrosion can occur that is not visible.
- Usage: Heavy use, exposure to harsh weather conditions, and lack of maintenance can shorten the lifespan of rigging.
- Previous Damage: If the rigging has been subjected to any significant loads or shocks, such as a grounding or severe storm, it should be inspected by a professional.
Professional Inspection:
- If you have any doubts about the condition of your standing rigging, consult a qualified rigger for a professional inspection. They have the expertise to identify potential problems that might be missed during a visual inspection. They can also perform more advanced tests, such as dye penetration or X-ray, to check for hidden cracks or corrosion.
What tension should standing rigging be?
What tension should standing rigging be?
Determining the correct tension for sailboat standing rigging is crucial for performance and safety. It's not a one-size-fits-all answer, as it depends on several factors:
- Boat Size and Design: Larger boats generally require higher rig tension than smaller boats. The specific design of the hull, keel, and mast also plays a role.
- Mast Type and Material: The type of mast (e.g., keel-stepped, deck-stepped) and the material it's made from (e.g., aluminum, carbon fiber) influence the appropriate tension. Carbon fiber masts, for example, can handle higher tensions.
- Sailing Conditions: If you frequently sail in heavy winds, you might want slightly higher tension.
- Sail Type and Size: The size and type of sails also impact the loads on the rigging.
- Manufacturer Recommendations: The boat builder or mast manufacturer often provides recommended rig tension specifications. This is the best place to start.
General Guidelines (Use with Caution and Always Consult Professionals/Manufacturers):
While precise numbers vary, some general principles apply:
- Headstay Tension: The headstay should be tensioned enough to minimize sag when sailing upwind. Too little tension can lead to excessive headstay sag, reducing upwind performance. Too much tension can put undue stress on the mast and hull.
- Shrouds: The shrouds (the wires supporting the mast from the sides) should be tensioned to keep the mast straight and prevent it from pumping (moving back and forth) in waves. Lower shrouds are typically tighter than upper shrouds.
- Backstay: The backstay controls the fore and aft bend of the mast. Adjusting backstay tension can significantly affect sail shape and performance.
Tools and Methods for Tensioning:
- Loos Gauge: This tool measures the tension in the rigging wires. It's a common tool used by riggers.
- Tension Meter: More sophisticated devices are available that provide very accurate tension readings.
- "Hand Tight" Plus Turns: Some sailors use a method of tightening turnbuckles by hand and then adding a certain number of turns with a wrench. This method is less precise and is not recommended unless you have extensive experience.
Professional Help is Essential:
- Initial Rig Tuning: It's highly recommended to have a qualified rigger tune your rig, especially when the boat is new or after any major changes to the rigging.
- Regular Checks: Even after a professional tuning, you should regularly check your rig tension and make minor adjustments as needed.
- Don't Over-Tighten: Overtightening can cause damage to the mast, hull, and rigging. It's better to have the rigging slightly too loose than too tight.
I have intentionally avoided giving specific tension numbers because they are so dependent on the boat and its configuration. Providing general numbers could be misleading or even dangerous.
Should leeward shrouds be loose?
Should leeward shrouds be loose?
The question of whether leeward shrouds should be loose is a bit nuanced and depends on the specific boat, rig setup, and sailing conditions. Here's a breakdown:
General Principle:
Ideally, leeward shrouds should not be completely slack. Some tension is generally desirable to maintain mast stability and control sail shape.1 Completely loose leeward shrouds can allow the mast to pump or move excessively, which can be detrimental to performance and even put stress on the rig.2
Factors Affecting Leeward Shroud Tension:
- Boat Size and Design: Smaller boats with less robust rigs may be more susceptible to mast pumping with loose leeward shrouds. Larger boats with stiffer rigs might tolerate a little more slack.
- Rig Type: The type of rig (e.g., fractional, masthead) influences shroud tension requirements.
- Sailing Conditions: In light winds, leeward shrouds might appear to have less tension. In heavier winds, the load on the windward shrouds will increase, and the leeward shrouds should still have some tension to prevent the mast from bending excessively.
- Sail Trim: How the sails are trimmed can affect shroud tension.
Why Some Slack Might Appear:
- Apparent Slack: Due to the geometry of the rigging, the leeward shrouds might appear to have less tension than the windward shrouds. This doesn't necessarily mean they are completely slack.
- Designed Slack: Some boats, especially those designed for racing, might be set up with a small amount of designed slack in the leeward shrouds under certain conditions to optimize sail shape and reduce drag. This is usually a carefully tuned setup and not something to be adjusted casually.
Problems with Excessively Loose Leeward Shrouds:
- Mast Pumping: As mentioned, this can distort the sail shape and reduce efficiency.
- Rig Damage: Excessive mast movement can put stress on the mast, spreaders, and other rigging components.
- Loss of Control: In extreme cases, excessively loose leeward shrouds can make the boat difficult to control.
Recommendations:
- Consult a Professional: The best way to determine the correct shroud tension for your boat is to consult a qualified rigger. They can assess your rig and provide specific recommendations.
- Observe and Learn: Pay attention to how your boat sails in different conditions. Observe the leeward shrouds and how they behave. This will help you develop a feel for what is normal.
- Don't Over-Tighten: While leeward shrouds shouldn't be completely slack, over-tightening them can also cause problems. It's a balance.
In summary, while leeward shrouds might appear to have less tension than windward shrouds, they should generally not be completely slack. Some tension is important for mast stability and performance. The ideal tension depends on several factors, and consulting a professional rigger is recommended. Observing your boat's performance and learning how the rigging behaves in different conditions is also valuable.
Next: Part 2 - Running Rigging
Recent Articles
-
Is Marine SSB Still Used?
Apr 15, 25 02:05 PM
You'll find the answer to this and other marine SSB-related questions right here... -
Is An SSB Marine Radio Installation Worth Having on Your Sailboat?
Apr 14, 25 02:31 PM
SSB marine radio is expensive to buy and install, but remains the bluewater sailors' favourite means of long-range communication, and here's why -
Correct VHF Radio Procedure: Your Questions Answered
Apr 14, 25 08:37 AM
Got a question about correct VHF radio procedure? Odds are you'll find your answer here...
